Antique Sheet Music Flourishes

Tuesday 22 February 2011

A Story of Restoration
Hall, Stairs & Landing Project      


This has to be one of the most challenging of all my projects to date purely because of the height of the area and the fact that every inch of wall space was covered in wood-chip wallpaper and all the skirting boards, door frames and stair risers, treads and string were covered in dirty blistered paintwork.  


My father took some measurements and obtained some scaffolding for me, which he subsequently assembled at the first landing on the stairwell.  This would be a permanent feature for weeks to come so had to be assembled to allow access up and down the stairs.  I spent hour after hour stripping off layers of wallpaper and even found some old Victorian type patterns beneath the wood-chip which were a complete nightmare to remove and were pasted to the wall with very strong adhesive.  I also purchased some heavy duty paint stripper which resembled a thick paste and had to be formed around the dado rail then sealed with plastic and left for a couple of days.  It was well worth the wait when I came to peel away the stripper it brought layers of paint and stain away with it to reveal the wood patina beneath.       
Wood-chip paper removed


Before work commenced
White panel on bedroom door
Oil based glaze on original door
                    Once all the woodwork and paper was stripped away I had the walls plaster skimmed and was then ready to stain the woodwork and paint the walls.  The ugly panelling was removed from the bedroom doors on the top landing to reveal the original 4 panelled doors beneath, these were stripped of an oil-based glaze which had been combed to create a wood grain effect.  There was not an inch of white woodwork left by the time the project was completed.     
                                       

Accessorising
I bought a set of twelve prints of Istanbul and twelve matching picture frames and mounts and these are displayed at the top and bottom of the staircase.  The bench in the downstairs hall was purchased from an antique centre at Wentworth.  The light fitting at the top of the staircase was a challenge, it needed to be large because of the ceiling height and it required a long chain to allow for accessibility.  I found what I was looking for on a shopping trip to Ikea and the chandelier now takes pride of place over the stairwell.  The mirror and cushions have been purchased whilst out on shopping trips over a period of time and I am sure you will agree that they complement the overall scheme.     


The tiles on the floor are the original Victorian ones and are I am pleased to say complete , the spindles, posts and handrail on the staircase were already in the property when I purchased it and I stripped the staircase to match these.


Friday 18 February 2011

The Language of Colour      


Warm Colours
Reds, pinks, oranges and yellows - all the colours associated with sunshine.  These colours also create a warm and welcoming atmosphere in the home.  Colours from this side of the colour wheel will make  a large room appear smaller, or brighten a room that does not receive much sunlight.  When planning a warm colour scheme a point to remember is the closer your chosen colour is to a 'warm' primary red or yellow the stronger it is.  It is difficult to live with large amounts of these colours and it is wise to choose a softer colour e.g. pink, peach or primrose and utilise stronger colours as accents in your scheme.


Cool colours
The opposite side of the colour wheel consists of greens, blue-greens and blues.  The colours of shady forests and cool water or azure skies.  If you want your scheme to have a cool calm atmosphere then select these colours.   Cool colours appear further away than warm colours and make a small room appear more spacious.  Take care when using cool colours in a room facing away from daylight, the scheme may appear too bleak.  In a room where there is a lot of natural light most cool colours will be fine without the room appearing too cold.


Contrasting Colours
If you want to give a room a brighter appearance use a contrasting colour scheme, these are opposite each other on the colour wheel, for example red and green or blue and orange.  These are known as complementary colours because they intensify each other and the scheme is vibrant.  However, do not use contrasting colours in equal amounts because they will compete with each other, so choose one colour as the dominant colour.


Harmonious Colours
You can choose two, three or even four colours that lie side by side on the colour wheel and be confident that they will combine well in your scheme because they are closely related.  Examples of harmonious colours are: pink, apricot, peach and gold or  clear blues, blue-green, aqua and green.  There is a common theme between one colour and the next so they work together well.


Pastel Colours
These are pure colours that have been lightened with a large amount of white.  Examples are:  red lightened with white = pink, pure yellow would become lemon and orange would become apricot.  Pastels are known as ice-cream colours and are always fashionable because they are pretty and have a fresh look.  Pastels blend nicely with lighter ranges of muted colours and both with modern and traditional style interiors.  Any pastel colour will coordinate with another, even opposites on the colour wheel because they all contain the common element of white.


Subtle and Muted colours
Pure colours darkened by adding grey or black are known as 'shades' or 'muted' colours.  There are also more subtle colours made up of a mixture of two or more pure colours, for example orange with a small amount of blue.  Other examples of colours in this range are mustard yellow, plum, mulberry or blackberry.  Muted colours have a cosy feel of autumn about them and because they contain an element of black look striking teamed with black accents.  To prevent a scheme appearing too heavy it is advisable to add accents of brighter colours.


Neutrals
Neutrals range from white to creams, beiges, tans and browns or from pale silver grey to black.  These colours are great for creating an overall neutral scheme or combining with more definite colours.  Inspiration for these colours comes from natures earth colours and they are easy to live with and are a perfect background for featured items of furniture or pictures.


Tones
When choosing a colour scheme it is important to consider the range of tones.  Tone describes the lightness or darkness of a colour - pink, red and maroon = light, medium and dark tones.  A scheme that contains only light and dark tones can look disjointed so it is important to include some mid-tones to make the colour scheme flow.  By using a range of tones in your chosen colours a room scheme becomes more satisfying to the eye.


Accent Colours
Small touches of bright and contrasting colours can bring a scheme together.  Most colour schemes, especially if they are based on neutrals will benefit from the use of an accent colour.  A scheme that is monochrome (predominantly one colour) will benefit from a few accents for added interest.  These can be selected by using the colour wheel, select a colour from the side opposite the dominant colour in your scheme.   If a scheme is based on pattern printed in several colours it is more effective to select one colour and go for a brighter or more intense version of that colour.


Thursday 10 February 2011

The Theory of Colour   


Understanding colour will give you confidence to create successful colour schemes.


Different colour schemes can alter the appearance of a rooms proportions and make the same room appear elegant, cosy, soothing, stimulating or dramatic.


Knowledge of basic principles of colour theory will enable even a novice to create colour schemes with confidence and help you in achieving the right mood and effect desired.


The Colour Wheel
A useful tool for understanding how colours relate to each other and how to combine them in schemes.  
  
Primary Colours
Primary colours cannot be mixed from other colours - pure red, pure yellow and pure blue - these divide the colour wheel
into three equal parts.


Secondary Colours
Secondary colours are mixed from equal amounts of two primary colours
 - pure green is made from equal amounts of yellow and blue
- violet is made from equal amounts of red and blue
- orange is made from equal amounts of red and yellow


The human eye can distinguish over 10 million different colours and every one is based on the colours of the rainbow - red, yellow, orange, green, blue, indigo and violet plus black and white.


The colour wheel was invented to demonstrate how basic colours relate to each other and how they can be combined to make other colours.


There are many intermediate colours yellow-greens, blue-greens, blue-violets and so on which are all mixed from neighbouring colours.


Contrast Colours
Direct opposites on the colour wheel e.g. red and green, yellow-orange and blue-violet.


Harmonious Colours
These lie side by side on the colour wheel and share a common base colour e.g. yellow-orange, orange and red-orange.


Pastels, Shades and Mixtures
The colour wheel is made up of pure colours (colours made from a mixture of two neighbouring colours).


Fabrics and wallcoverings are manufactured in paler (less intense) or lighter (with a mix of white - known as pastel), muted and shaded (mixture of grey or black), subtle mixes - e.g. a hint of colour from another part of the wheel is added - yellow-orange and a hint of blue.


The topic of colour is extensive and in-depth and it is my intention to break it down  into manageable chunks in separate articles.   My next topic will discuss contrasting and harmonious schemes amongst others in greater detail so watch this space.


Aileen


Saturday 5 February 2011

Making and Cutting Stencils
A Look back at History
Stencilling is an easy and effective way to create shapes and patterns and has been practised for thousands of years.  It is thought that stencilling was practised as a decorative form by the ancient Egyptians in 2500BC.   Many examples of primitive stencilled designs have also been discovered on fabric, pottery and other artefacts made in China, Indonesia and South East Asia.  


The introduction of wallpaper to Europe in the late seventeenth century presented new opportunities for stencillers and one of the most dramatic uses of stencils over the last three hundred years has been the manufacture of flock wallpapers.


Materials Required
Fabric                                                       Pencil                                      Paint
Cutting Board                                          Acetate/stencil film             Stencil Brushes
Craft Knife                                               Masking Tape                       Tracing paper


You will find ideas almost everywhere you look for designing a stencil.  Examples are china, wallpaper, antique tiles, fabric patterns or even wrapping paper.  It may be possible to copy the design directly if it is already printed on a flat surface to the required scale.  There will be no need to redraw the design before you trace onto acetate or stencil film if this is the case.


I have taken my design from a piece of fabric in a traditional design.    Lay the fabric flat and place tracing paper over  the pattern to be copied and trace around the outline with a soft pencil.  Try to make the outline dark because this will be used to create an impression to transfer onto the acetate or stencil film.


Place tracing paper on top of the acetate and secure with masking tape.  Carefully trace around the copied design with pressure to transfer the outline onto the acetate or stencil film.


Place acetate onto a cutting board and secure with masking tape.
Using a sharp craft knife cut out the pieces in turn until you have a
copy of your original fabric pattern.
Now your stencil is ready to transfer.  I have copied mine onto a piece of lining paper just to show the final result.  Stencils can be copied onto fabric, walls, floors and items of furniture.


Finally secure the stencil to the wall, floor or item of furniture and dab a small amount of paint with a sponge or stencil brush onto the stencil design.  Do not overload the brush or sponge.  I usually dab the paint onto a piece of newspaper first.   


The finished design


I am sure you will agree the finished product is simple but effective.    
HAPPY STENCILLING                                        Aileen

Thursday 3 February 2011

Welcome to my Boudoir    
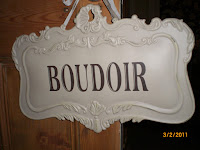
I just had to share my latest purchases for my bedroom, my own personal space.  Some months ago I stumbled across a mail order company based in my home town of Doncaster and discovered that they also have a showroom.  The company sell Vintage and Fench style home furnishings.  I have to visit as often as possible because it is my favourite place to shop.    This sign will take pride of place on my bedroom door  

My other favourite piece is my Mannequin.  This was my first purchase from Melody Maison and an item that I have always desired.   It fits very well into my black, gold and cream colour scheme.  I will share more photos of my Boudoir at a later date.  Watch this space.

Aileen